


Wide Tongue & Groove Wall Panels
Wide Tongue & Groove Wall Panels
Couldn't load pickup availability
Key Panel Features:
- Made-to-order in the UK 🇬🇧
- Paintable & Moisture-Resistant
- Sustainable
-
Cut to Size Available
- Easy Installation
Add timeless style and texture with our Wide Tongue and Groove Wall Panels.
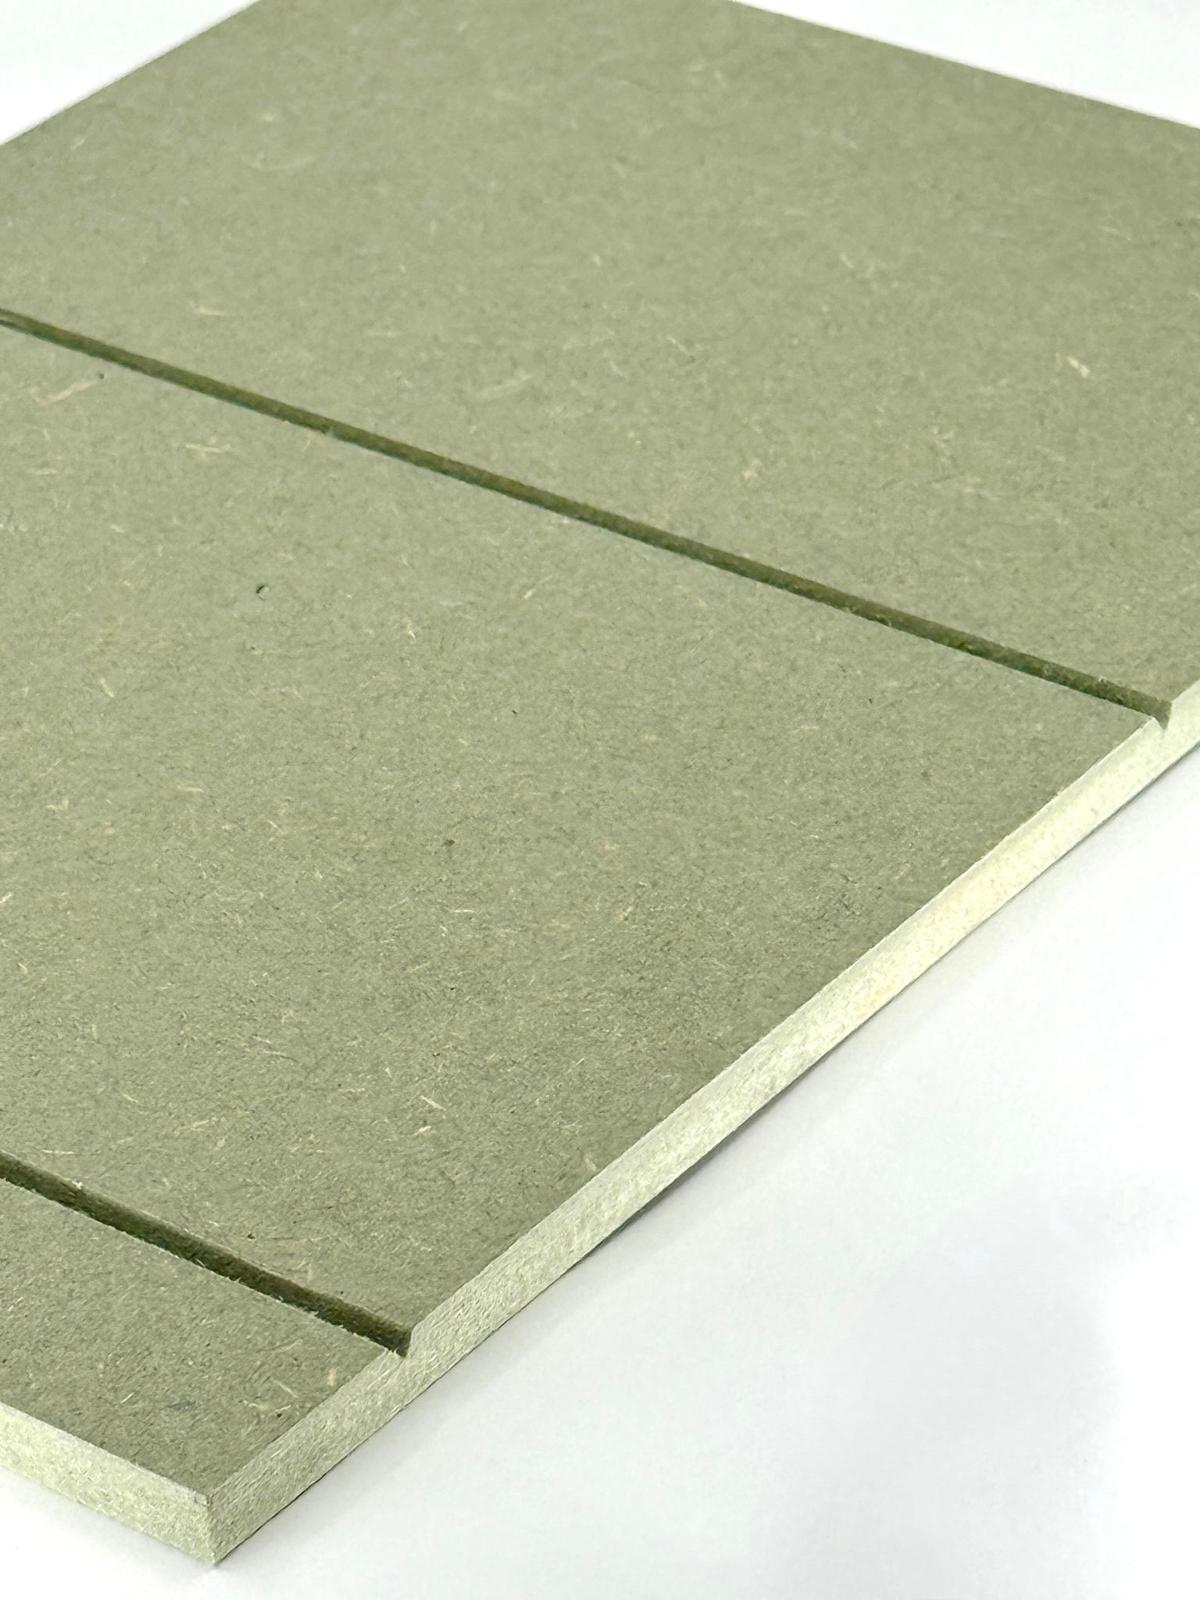
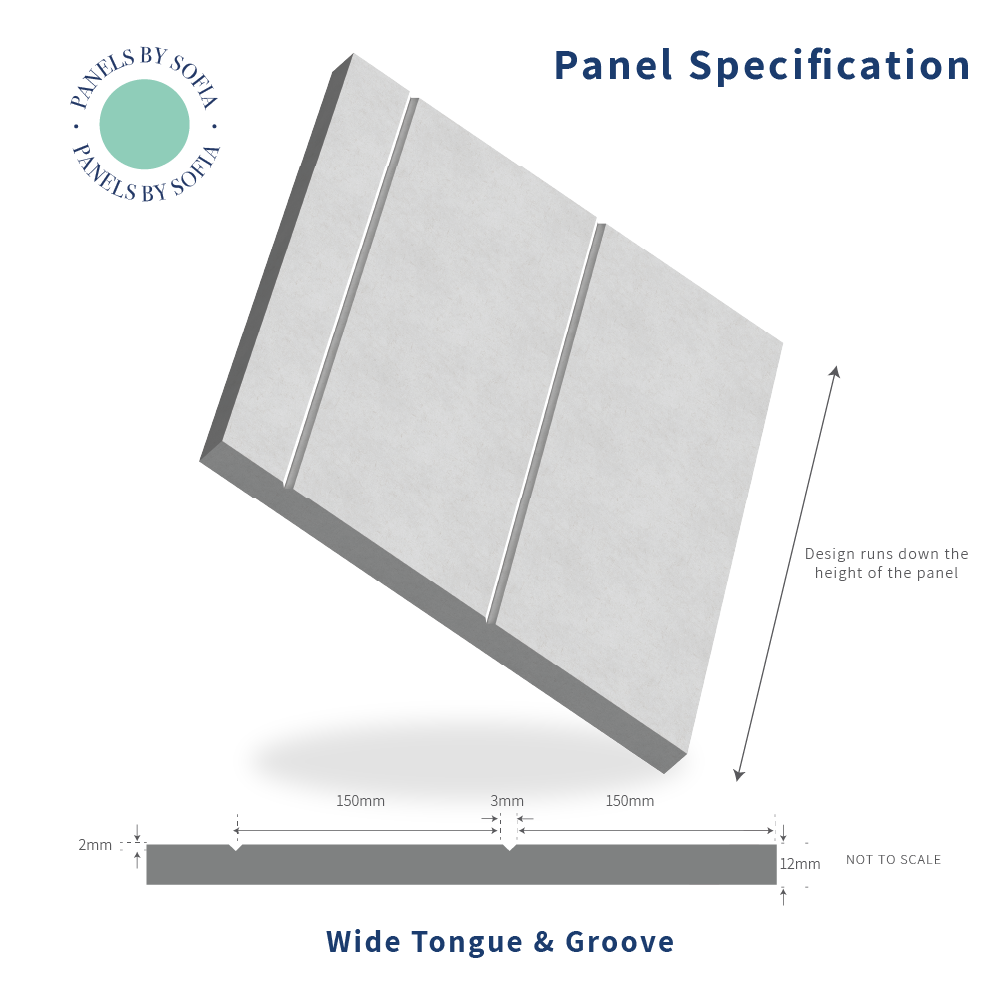
Featuring a 5mm V-groove design spaced 150mm apart, these large panels bring clean lines and subtle detail to any room. Choose portrait or landscape orientation - both feature vertical grooves for a classic look.

To save time, use our cut-to-size service for a perfect fit. Installation is quick and easy: just prime, paint, and fix with grab adhesive.
If you're panelling a commercial space or working near heat sources, check out our Fire Rated Wall Panels for enhanced safety.
What Size Should I Order?
What Size Should I Order?
Choosing Size
Portrait (tall)
Use portrait when the panel needs to be taller than wide – e.g. floor-to-ceiling.
Landscape (wide)
Use landscape when the panel needs to be wider than tall – e.g. half-height walls, media walls, shelving.
Dimensions
All measurements are shown in millimetres (mm).
For half-height walls, we usually recommend around 1200mm high.
For exact finished sizes, choose Cut To Size so we cut to your exact mm.
Design direction
The panel pattern always runs vertically in both portrait and landscape.
To achieve horizontal lines, order portrait and install on its side.
Measuring Tips
- Walls are rarely perfectly straight - allow a few extra mm if needed
- Measure from the top of the skirting (not the floor)
- If there is coving, measure from the bottom of the coving
- Panels join seamlessly in almost all cases
- If joining two full-size sheets (2440×1220mm or 3050×1220mm) these may need a light trim for a perfect seamless join
Design
Design
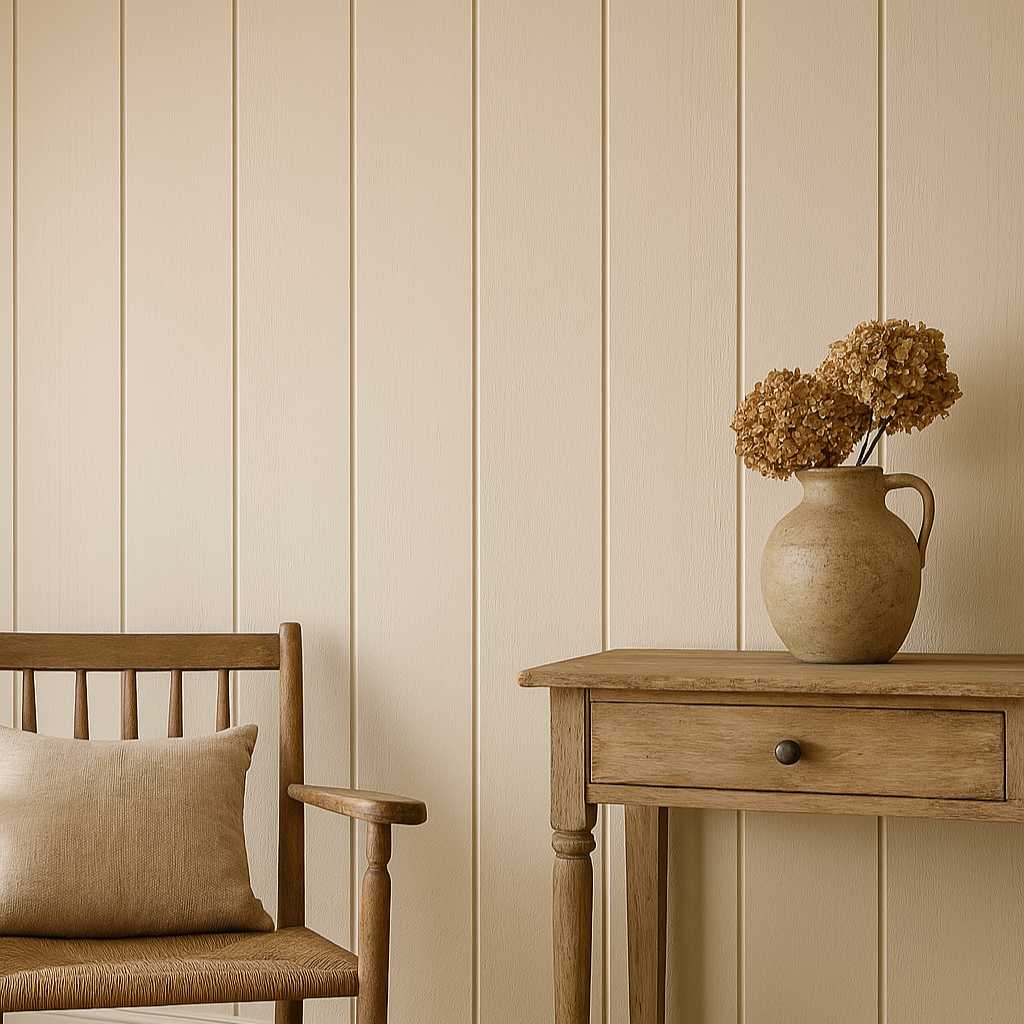
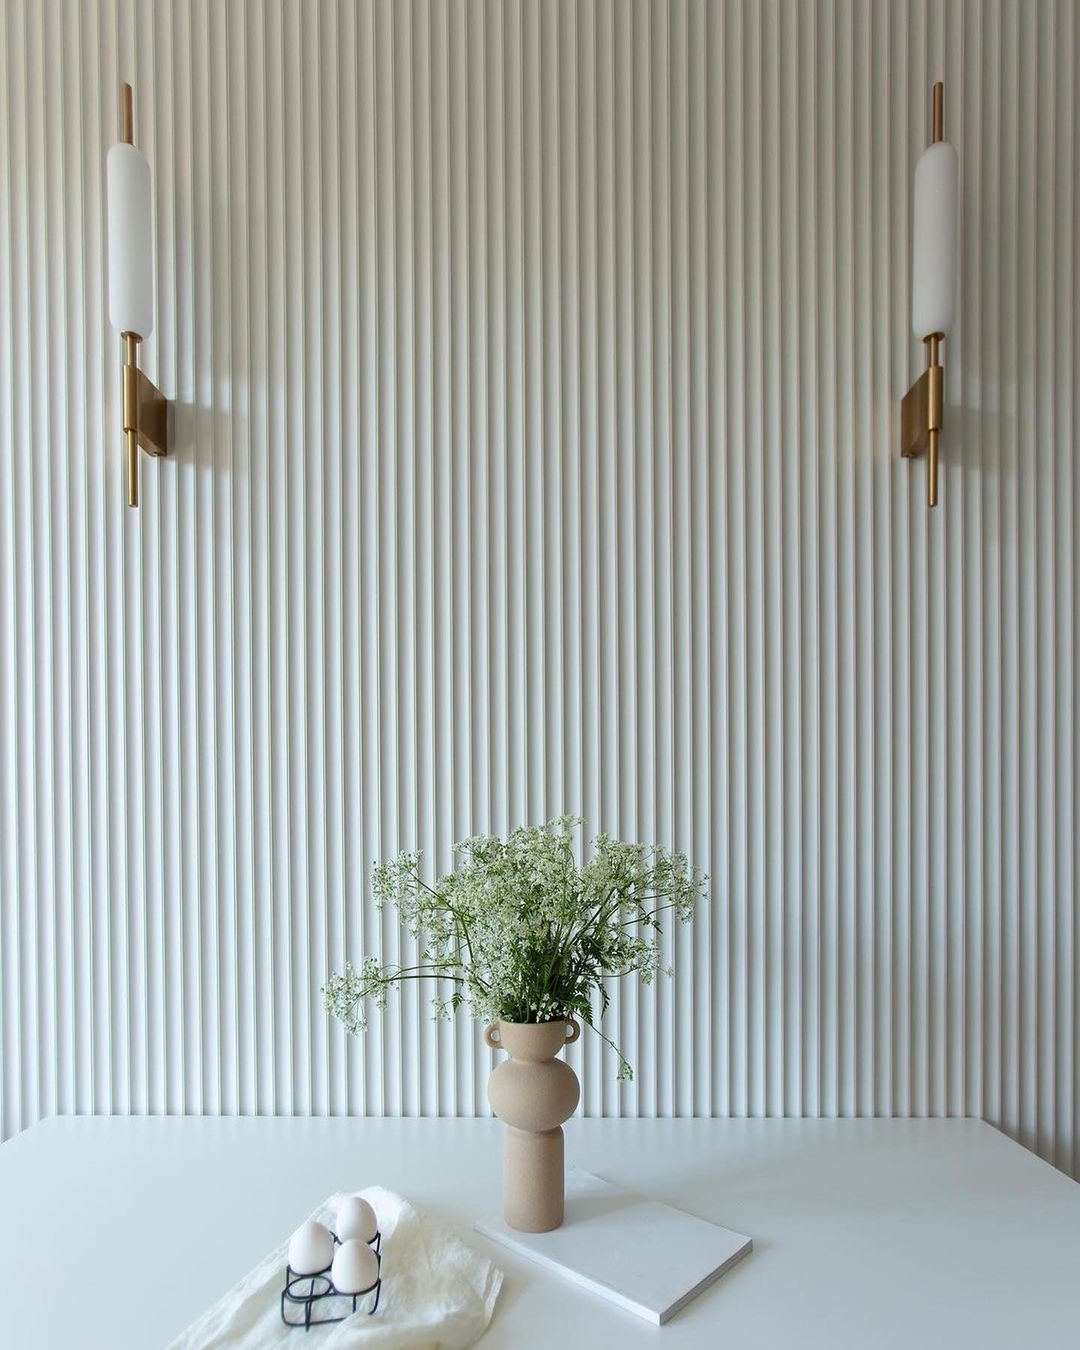
Our Large Tongue and Groove Wall Panels are designed to suit a wide range of interior styles and spaces. With distinctive 150mm panel widths with 5mm V-grooves and a clean, linear look, this wall panelling brings texture, depth, and timeless character to any room.
Farmhouse Charm: The broad vertical grooves create a rustic yet refined look - perfect for adding warmth and texture to kitchens, dining rooms, and cosy living areas. Pair with natural wood tones or warm neutrals for a homely, timeless feel.
Coastal & Cottage Style: Painted in soft whites, pale greys, or gentle pastels, these panels evoke the light, airy charm of seaside and country homes. Ideal for bathrooms, bedrooms, or laid-back open-plan spaces.
Modern Traditional: The defined V-groove design adds subtle architectural interest, making it a stylish choice for hallways, boot rooms, or entranceways. Works beautifully with heritage tones, deep blues, and olive greens.
Scandinavian Minimalist: The clean, linear detailing aligns perfectly with Nordic-inspired interiors. Use in monochrome or neutral colour palettes to create calm, minimalist bedrooms and contemporary living rooms.
Whether you're designing a statement feature wall or panelling an entire space, these wide tongue and groove panels offer a bold yet elegant foundation that elevates any interior style.
Our Cut To Size Service
Our Cut To Size Service
Our Cut-to-Size Service ensures a perfect, custom fit for your project. Each panel is precisely cut, saving you time, effort, and the expense of hiring a professional.
Get your bespoke panels here: Cut-to-Size Wall Panels
How To Install
How To Install
Measure Your Wall Area
Begin by measuring the space where your wall panels will be fitted. This ensures you get the right dimensions from the start. You can trim the panels yourself if needed, or use our handy cut-to-size service for a perfect fit.
Prepare the Panels
Apply a primer to the panels to create a smooth base. This step helps the paint adhere better and ensures a clean, even finish.
Paint Your Panels
Pick your preferred paint colour and apply it evenly to each panel. Allow the paint to dry fully before moving on to installation.
Apply Adhesive and Fit the Panels
Apply a suitable adhesive to the back of each panel. Carefully place the panel onto your wall, pressing it firmly into position. Use masking tape or temporary supports to hold the panel in place while the adhesive cures.
Check out our full step-by-step installation guide here.